Robotics Design Process
![]()
-
identifying the purpose of a construction
-
identifying specific requirements
You are confronted with a situation. Here are two examples:
A community wants to construct a robot zoo in which the "animals" move their heads, open their mouths and make appropriate sounds when they sense that someone is coming towards them. Design and build a prototype device which could satisfy this need.
A local pet shop wishes to sell a range of devices which automatically feed small cage pets (such as rabbits, gerbils, mice etc.) when their owners are away for the weekend. Design and build a prototype device which could satisfy this need.
You need to determine what problem you are trying to solve before you attempt to design and build a robot to solve a problem. Take the time to study a number of different situations and once you have decided what the situation is and you understand exactly what the problem is then write a design brief in a log book (this will be your working document as you work on your robot. This log book can be a paper notebook or an electronic document.) This is a short statement which explains the problem that is to be solved.
![]()
-
gathering information
-
identifying specific details of the design which must be satisfied
-
identifying possible and alternative design solutions
-
planning and designing a appropriate structure which includes drawings
Having written a brief, you are now ready to gather information which will help you to produce a successful design. First you will need to decide what information you require. This will be different from project to project and will also depend on the amount of information and knowledge you already have. A useful step will be to use the following chart. Ask the five questions, then read the column headed Gathering Information. This will help you plan the type of information you will need to gather.
|
Gathering
Information
|
|
| 1. What is the practical function of the design? (What must my robot do?) |
A design's practical functions can include:
|
| 2. What part does appearance (shape and form, surface texture, colour, etc.) play in the design's function? What does the robot look like? Is there a reason for it to look as it does? |
Shape and form are important to a design's aesthetic qualities, ergonomics, strength, stability, rigidity, safety Surface texture, finish and colour can be appropriate to a design's:aesthetic qualities, mechanical, optical and thermal properties, durability, etc. |
| 3. What materials are suitable for the design? |
The properties of a material will determine its suitability for a design. For our work with robotics we have chosen to work with LegoT™. However, there are many different types of materials that can be and are used in the construction of robots.
The materials cost and availability are also important factors. |
| 4. What construction methods are appropriate to the design? |
Construction techniques fall into the categories of:
A particular material can only be worked in a limited number of ways. The method of construction therefore will be determined by the chosen material, the availability of manufacturing facilities, the skills of the work force and the production costs. |
| 5. What are the likely social and environmental effects of the design? | The manufacture, use and disposal of any product will have both beneficial and detrimental effects upon people, wildlife and the environment. The designer therefore, has an enormous responsibility to consider very carefully the potential effects of any new design. This will include: health and safety factors, noise, smell, pollution, etc. |
Gathering information can involve reading, listening, conducting interviews and observing.
A specification is a detailed description of the problem to be solved. It should 'spell out' exactly what the design must achieve.
![]()
-
testing the design
-
troubleshooting the design
You should ideally think of at least three different ways to solve the problem before you concentrate on any one in particular. Sketches and notes are required at this stage. You can also create prototypes using lego for this step. Once you have created a lego prototype, take a digital picture of it. Print out the picture and jot your notes below the picture in your log book. Once you have settled on one solution, go back over the list of specifications you have made. Make sure that each specification is satisfied.
Now it the time to produce some working drawings. These are the drawings that will assist you as you begin constructing the prototype of your structure. (Here again, lego and a digital camera might be your best friend.) You may choose to do your drawings by hand or you might want to use a draw program on the computer to assist you.
Determine a working schedule for yourself. Draw up a timetable showing how much time you expect to spend on each part of the design process. Your planning should also ensure that you have all the necessary materials and equipment that you need to complete your project.
![]()
- The Art of LEGO Design by Fred Martin - an excellent resource for building very strong structures
![]()
Programming and Testing your Robot
Now it is time to program your robot. This can be achieved in many different ways. Use can achieve rudimentary intelligence in your robot by using only relays, potentiometers, bump switches and some discrete components. You can increase complexity in intelligence in your robot by adding more sensors and continuing in the same vein of using hardwired logic. By introducing a more sophisticated control element, the microprocessor, you introduce a significant new tool in solving the robot control problem. For our robots we used the RCX Brick that was first developed by Fred Martin at MIT as the Programmable Brick. See the following two programming examples:
Mindstorms™
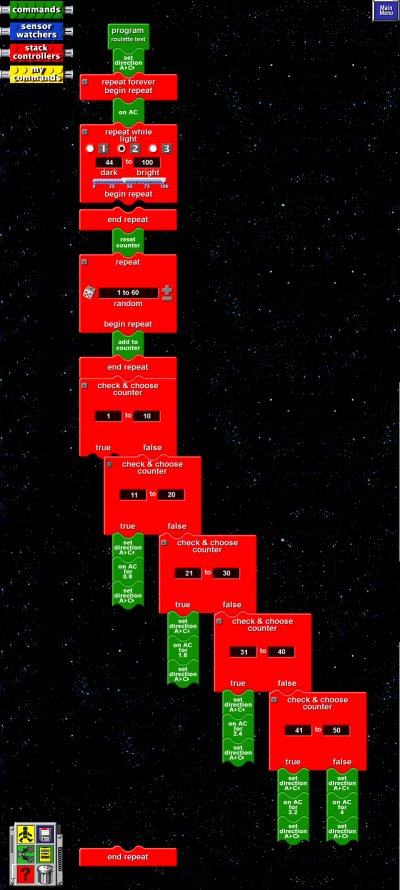
Robolab™ has two levels for programming.

Once you have written your program and downloaded into the RCX brick using the Infrared Sender, it is time to test your robot to see if it truly does what you want it to do.
![]()
-
evaluate the design
-
evaluate the planning process
As building and programming work progresses, and the design begins to take shape, you will automatically carry out tests on the design. You will also need to complete systems tests at various stages of the construction. If any of the tests show that you have failure in a joint, or that part of your structure is not meeting specifications, then you will have to make modifications in your plan.
When building and programming is complete, the entire project must be tested to see if it does the job for which it was designed. An evaluation needs to then be written. This should be a statement outlining the strengths and weaknesses in your design. It should describe where you have succeeded and where you have failed to achieve the aims set out in the specifications.
Here is a list of questions which will help you to prepare this statement.
-
How well does the design function?
-
Does the design look good?
-
Is the product safe to use?
-
Did I plan my work adequately?
-
Did I find the construction straightforward or difficult?
-
Were the most suitable materials used?
-
Did it cost more or less than expected?
-
How could I have improved my design?